This post describes the overall microphone design process: how to translate microphone requirements into a basic DIY microphone design. Parts 2 and 3 of this series will delve deeper into key aspects of the design process..
- A generic microphone block diagram
- The overall microphone design process
- Defining the microphone performance requirements
- Defining the microphone front-end architecture necessary to meet the performance requirements
- Defining the microphone interoperability requirements.
- Defining the microphone back-end architecture necessary to meet the interoperability requirements
- Completing the detailed design
- Wrap-up
A generic microphone block diagram
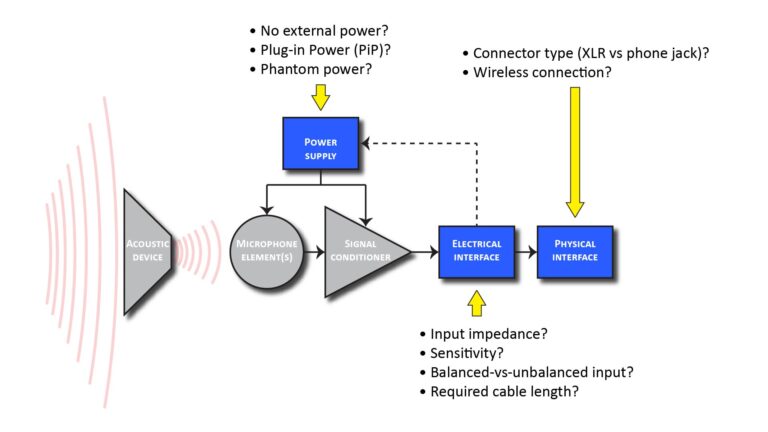
Before we can talk about the process of designing a microphone, we have to define exactly what a microphone is. A microphone is a system that includes a subset of the six subsystems (or functional blocks) shown in the accompanying figure:
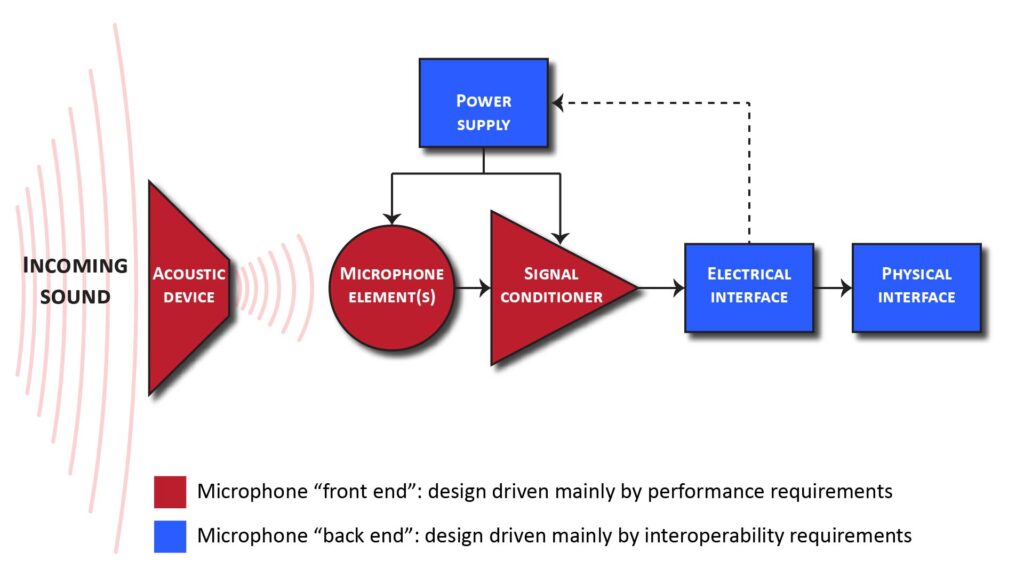
- The heart of the microphone system is one or more microphone elements that convert incident sound to an electrical signal in the analog or digital domains.
- Optionally, an acoustic device is used to modify the sound reaching the transducer subsystem. This could be an acoustic labyrinth or filter, baffle, parabolic reflector, interference tube, boundary-layer plate, etc.
- Optionally, a signal conditioner processes the electrical signal produced by the transducer subsystem. This could include amplification, buffering, summing, filtering, delaying, or other signal-processing functions.
- An electrical interface converts the output of the signal conditioner to the desired microphone output format. This could be an analog signal or a digital signal.
- A physical interface connects the microphone’s output to wherever it needs to go. This could be a cable and connector, or even a Bluetooth A2DP transmitter.
- Optionally, a power supply supplies electrical power to the microphone element(s) and signal conditioner.
All of these blocks contribute to the overall function of the microphone. However, for design purposes, it’s useful to group them into two sections: the front end (which determines the microphone’s performance) and the back end (which serves as the interface between the microphone and the downstream device).
Each of these six blocks can be implemented in many different ways in an actual microphone design, leading to an enormous number of possible microphone configurations. Fortunately, the number of practical configurations is much more manageable.
Now that we have a generic block diagram, we can discuss the microphone design process.
The overall microphone design process
The type of design homework you need to do (if any) before building a microphone depends on exactly what you’re trying to achieve, as shown in Figure 2:
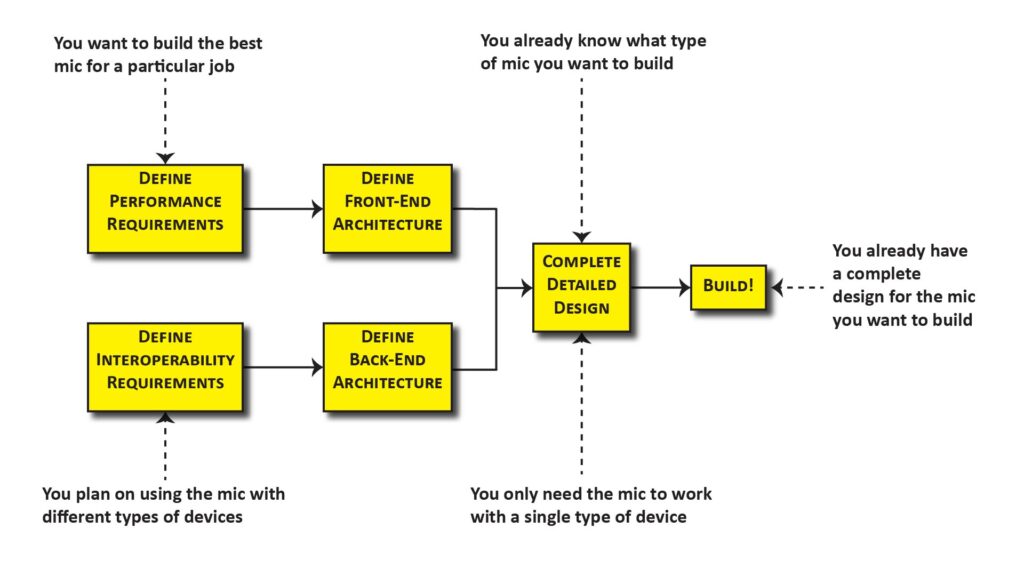
Obviously, if you’re building a microphone from a kit (or copying a detailed microphone design), then you don’t need to do any design work at all—just start building!
At the other extreme, if you’re trying to build the best possible microphone for a specific application, then you’ll typically need to do some homework to define the requirements and translate them into a buildable design. As shown in Figure 2: this can include up to five steps; we’ll briefly discuss each one below.
Defining the microphone performance requirements
Ensuring that a microphone has the right performance specifications is essential to ensuring that its output signal will be good enough for the intended purpose–and that applies to microphones you buy as well as those you build.
Microphone performance requirements, and how to define them, are discussed in detail in my post on the 4 key microphone specifications and why they’re important. In general, the performance requirements will depend on the type of sound to be captured, the amount and type of ambient noise, the distance between the microphone and the source, and the required fidelity of the output signal.
Defining the microphone front-end architecture necessary to meet the performance requirements
If you’re buying a microphone (or building one according to plans), then you don’t to perform this step. Otherwise, you need to choose a front-end architecture, as shown in Figure 2, that is capable of meeting the performance requirements. This includes the number and type of microphone elements, the type of acoustic directivity-enhancing device (if any), and the type of signal conditioning (if any). That’s the focus of Basic DIY microphone design—Part 2: microphone front-end design.
Defining the microphone interoperability requirements.
An important consideration in building (or buying) a microphone is the type of devices (such as field recorders, audio interfaces, mixing consoles, smartphones, or sound cards) it must work with.
Specifically, device characteristics like sensitivity, input impedance, type of power (if any) supplied to the microphone, and the type of microphone connector are important considerations in buying or building a microphone. I discuss microphone interoperability requirements in Basic DIY microphone design—Part 3: microphone back-end design.
Defining the microphone back-end architecture necessary to meet the interoperability requirements
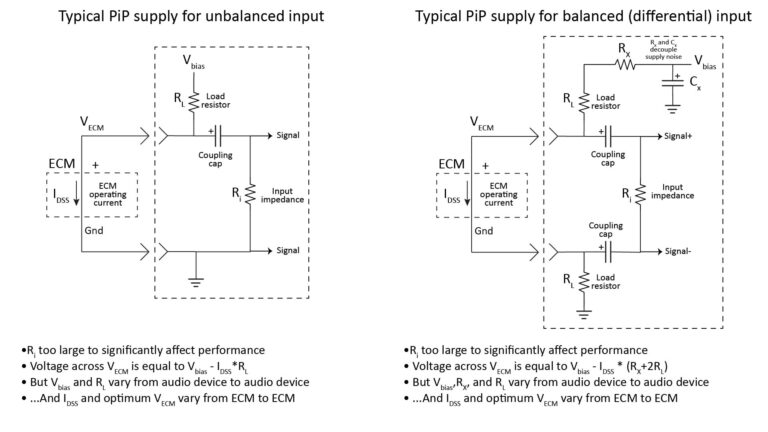
As shown in Figure 2, the microphone back-end architecture includes the power supply, the output signal buffer, and the cable/connector arrangement–all of which should be optimized to meet the interoperability requirements. How that’s done is also discussed in Basic DIY microphone design—Part 3: microphone back-end design.
Completing the detailed design
The final step is to translate the basic microphone front-end and back-end architectures into a buildable design. This includes selecting the specific microphone element(s), doing the detailed design of the acoustic directivity-enhancing device (if any), finalizing the schematics of the signal-conditioning circuitry (if any), and finalizing the component values.
This step depends so much on the specific microphone being built that it’s not practical to cover it in a single blog post. Instead, I’m going to address it in separate posts on topics such as microphone element selection, preamp design, and power-supply design.
Wrap-up
As we’ve seen, the overall microphone design process can be facilitated by decomposing the microphone into into a front-end and a back-end, each of which can be designed separately. Part 2 of this series deals with the front-end design process, while Part 3 deals with the back-end design process.